
Installation steps for Decorative Integrated Vacuum Insulation Panel
Below is a practical method statement for both Mid-Century-Modern (MCM) finish and metal-type DVIP (Sanyou London), including tools, substrate prep, fixing pattern, sealing, QA, and aftercare. The two variants share the same process; the metal panel adds one final peel of the protective film.
Before you begin: what to check and prepare
Tools and materials
- Laser level or chalk line; 2 m straightedge; moisture meter.
- Roller or brush for the interfacial agent (primer).
- Polymer-modified cementitious bonding mortar (exterior-grade), notched trowel, mixing paddle.
- Stainless expansion anchors and facade-grade screws; torque-limited driver.
- Masking tape, backer rod, façade sealant (neutral-cure or MS polymer, non-staining).
- Clean cloths, isopropyl alcohol for wipe-downs; soft suction cups for panel handling.
Substrate acceptance criteria
- Flatness: typically within ±3 mm over 2 m (check your project spec).
- Soundness: no friable patches; remove loose paint or laitance; repair voids.
- Dryness: substrate cured and dry to the manufacturer’s limit; free from oil and dust.
- Airtightness strategy: confirm any required air/vapour control layer is in place and sealed before panel fixing.
Handling the panels
- Keep panels in original packaging until needed; store flat, dry and shaded.
- Lift with two hands or suction cups; do not rest edges on sharp objects.
- Use only the factory anchor points; never drill through the vacuum area.
Weather window
- Install between 5 °C and 35 °C on a dry, non-frost day. Shield fresh work from rain and direct blasting sun.
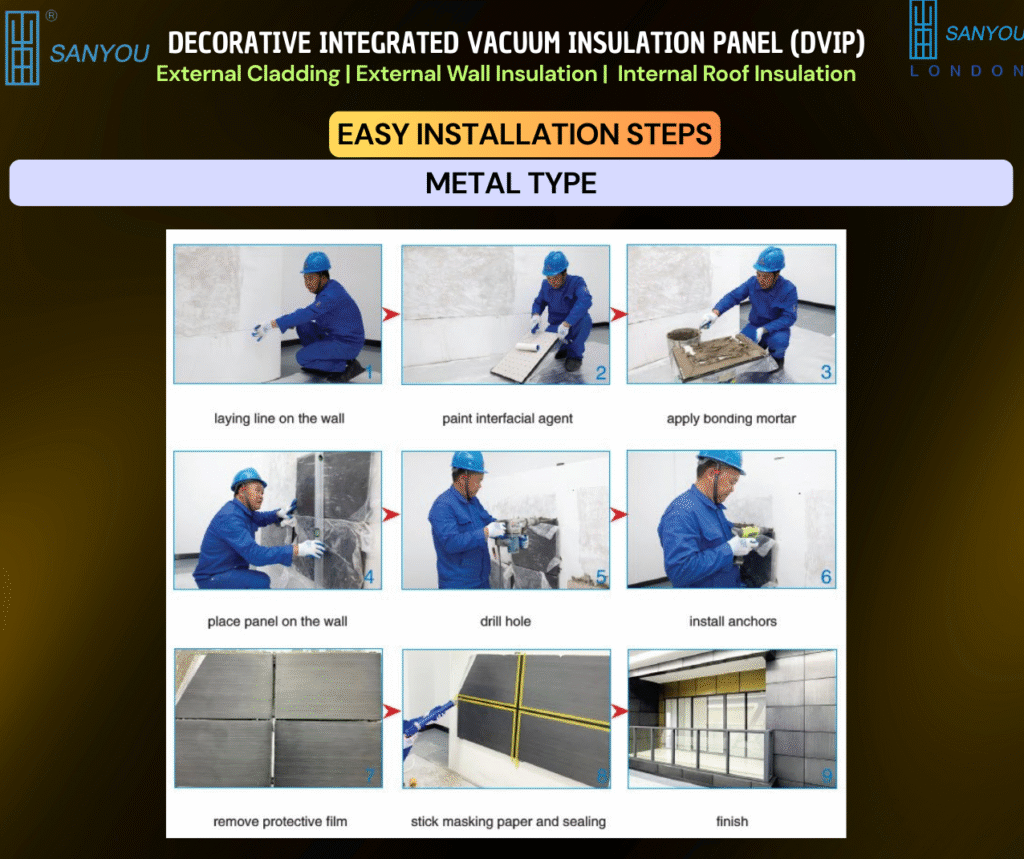
The eight-step method (MCM finish)
(Metal-type is identical—simply peel the protective film at the end.)
- Set out a reference line
Snap or laser a horizontal baseline and vertical grid to match the façade module. Confirm plumb, level and square. - Prime with interfacial agent
Roll a uniform coat over the prepared substrate. Allow it to flash off as per the product data sheet; aim for a tack-dry, dust-binding film. - Spread the bonding mortar
Mix to a creamy consistency. Trowel a full, even bed on the wall using an appropriate notch; comb in one direction. Aim for near-continuous contact; avoid air pockets. - Offer up and position the panel
Present the DVIP to the marks. Press firmly with a rubber float, sliding slightly to collapse ridges. Check level and alignment against the grid. - Pre-install fasteners
Locate the factory-designated anchor zones. Insert the stainless fasteners or sleeves loosely to hold position without stressing the panel. - Drill the marked holes
Through the anchor holes drill the substrate to the specified embedment depth. Vacuum dust from holes; do not ‘oval’ the openings. - Tighten expansion anchors and screws
Set anchors and drive screws until washers seat snugly. Use a torque-limited driver to avoid over-tightening. Re-check level and joints. - Mask and seal the joints
Tape both sides of the joint. Insert backer rod where required. Gun a neat bead of façade sealant and tool it to a slight hourglass profile. Remove tape immediately for a clean edge.
Metal-type only: once all panels are fixed and sealed, peel the protective film from the visible face as the final act.
Jointing, movement and edges (small details that make a big difference)
- Movement joints: honour structural joints and introduce façade movement joints at agreed centres or as per engineer’s note.
- Perimeters and openings: run continuous perimeter seals; return panels into heads, jambs and sills with pre-cut pieces to avoid cold edges.
- Base of wall: use a starter track or drip detail to shed water and protect the lower edge.
- Corners: use factory corner units or mitred pairs with reinforced trims; never leave exposed core or barrier film.
Fixing pattern and spacing (guide, not a substitute for engineering)
- Use the fixing schedule issued for your project. As a rule of thumb, expect four to eight anchors per standard panel, closer at edges and corners, and additional fixings in high wind zones.
- Keep all fixings outside the vacuum field; only the reinforced anchor points can be penetrated.
- Where rails are specified, fasten cassettes to rails using concealed hooks or kerfs designed for the system.
Sealants and compatibility
- Use neutral-cure silicone or MS polymer sealants that are UV-stable, low-modulus and non-staining on MCM and metal faces.
- Clean with isopropyl alcohol before sealing; avoid aggressive solvents.
- Always install a backer rod to control sealant depth and shape.
Quality assurance: simple checks that prevent call-backs
- Pull-off checks on early panels to verify bond strength.
- Joint audit: verify continuous backer rod and sealant joints; photograph corners and penetrations.
- Flatness and alignment: check each run with a straightedge and laser.
- Batch traceability: record panel IDs, adhesive and sealant batch numbers for O&M files.
- Water test: where appropriate, conduct a controlled hose test after sealant cure to confirm joint integrity.
Common pitfalls—and how to avoid them
- Over-tightening fixings: compresses the panel edge; use torque control.
- Adhesive voids: cause drumming and cold spots; comb mortar evenly and beat in the panel.
- Unprotected edges: chip risk and water traps; fit edge trims as you go.
- Wrong sealant chemistry: staining or poor adhesion; use approved products only.
- Unplanned penetrations: never drill the panel field; route fixings and services through designated zones.
Internal roof lining variant (brief note)
For cold spaces or soffits, the same eight steps apply to the underside. Use temporary props if needed while anchors are set. Seal all transverse joints; specify a washable finish for interiors.
Cleaning, handover and maintenance
- Clean faces with a soft cloth and mild detergent; avoid abrasives.
- Provide the client with the maintenance note, including approved cleaners, inspection intervals for sealant, and the simple module replacement method if a panel is ever damaged.
Safety and environmental notes
- Use appropriate PPE; manage dust from drilling with extraction.
- No hot works are required; plan access and edge protection per site rules.
- Dispose of waste adhesive and sealant responsibly; recycle packaging where facilities exist.
Need project-specific details?
Our technical team issues fixing maps, CAD details, and sealant schedules tailored to your elevations, wind zones and substrate. We can also brief your site crew before the first lift.
- Contact our Customer Service Team for step-by-step installation sheets, QA checklists and tailored price quotations.
- Prefer a direct discussion? Email or phone Professor Saim Memon to review drawings and finalise a site-ready method statement.
- Explore full product specifications, purchasing process, videos and FAQs at www.sanyoulondon.com.
Skip the multi-layer mess. With DVIP (Sanyou London) you get a luxury finish, high insulation, and a clean install—all in 30 mm.
Share


Author
Prof. Dr. Saim Memon
PhD, CEng, FHEA, MSc, BEng(Hons), PGC-TQFE, GTCS, MCMI, MIET, MIEEE, MInstP, IBPSA, APCBEES, MPEC
CEO | Industrial Professor | Inventor | British Scientist | Chartered Engineer | Qualified Teacher | Chief Editor | World Speaker | Pioneer in Vacuum Insulation Energy Technologies