DIY Vacuum-Insulated Wallpaper (VIW): How homeowners can insulate—properly—without contractors
Let’s address the practical reality in the UK and across Europe: installation is often the blocker, not the product. Quotes arrive with labour that dwarfs the material price; scaffolding complicates schedules; diaries are full for months. Result? People keep paying high energy bills and put insulation off indefinitely.
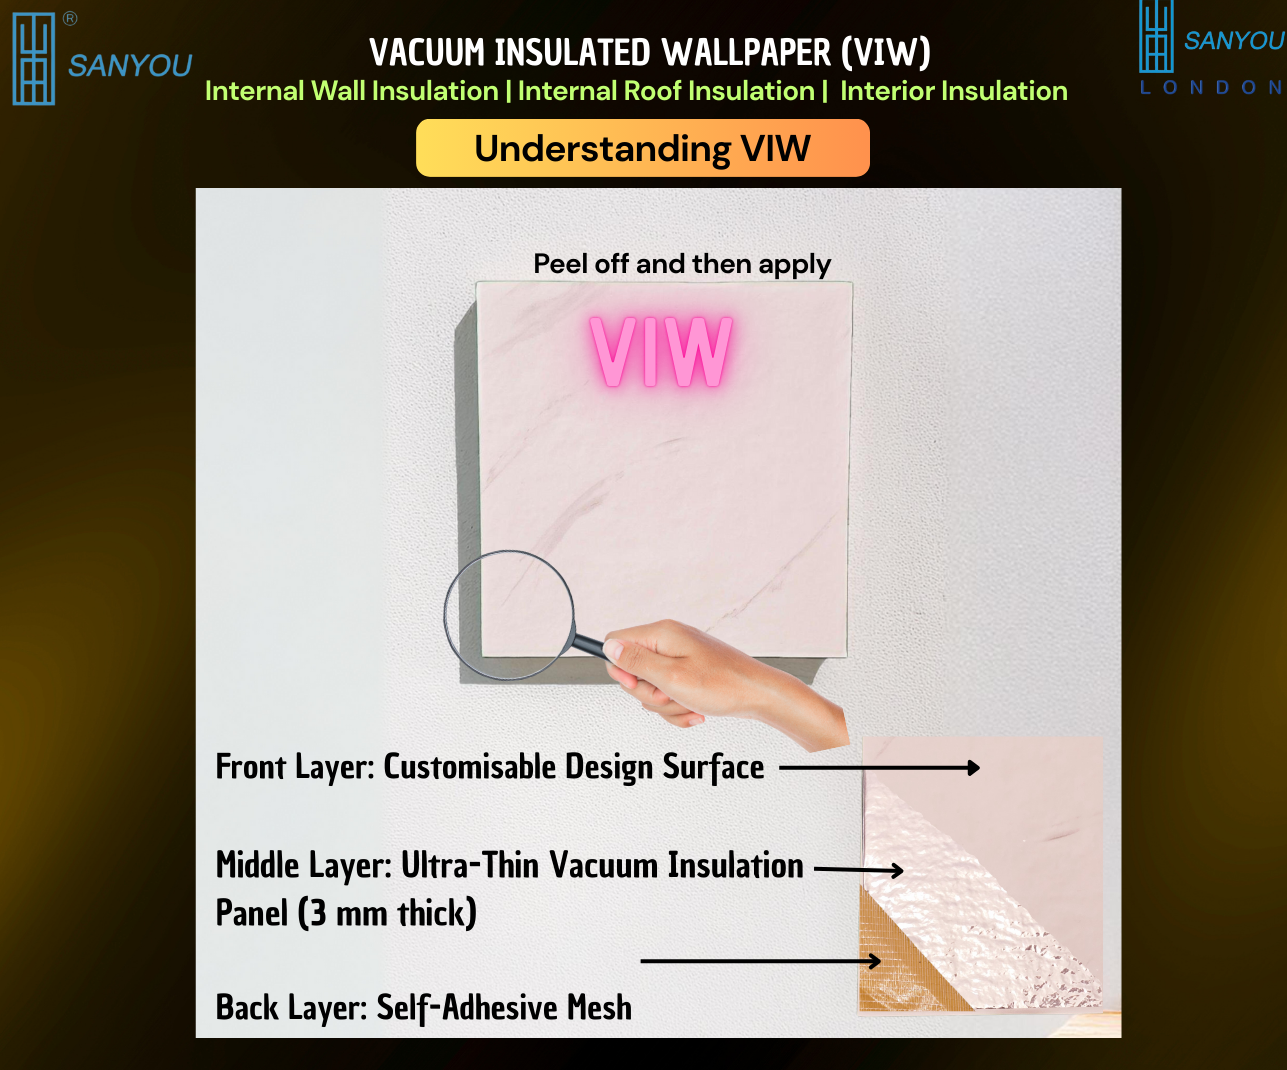
Vacuum-Insulated Wallpaper (VIW) changes the decision. It is a purpose-designed, 4 mm interior lining that delivers meaningful thermal resistance with no building crew, no drilling, and no dust-heavy demolition. It goes where standard boards do not: behind furniture, along cold external walls, and into awkward returns—all as a genuine DIY job.
What VIW is—built for homes, not labs
- Format: modular 200 × 200 mm tiles, deliberately small so one scuffed piece never compromises a whole wall; they ship easily and handle safely.
- Layers:
- Decorative face – any colour or pattern to suit your room.
- 3 mm vacuum-insulation core – single-digit milliwatt-class thermal conductivity for serious resistance in almost no depth.
- Self-adhesive backing – an oil-based glue reinforced with fibreglass mesh for a strong, durable bond on sound substrates.
- Custom sizes & shapes: we cut sets for bays, reveals, arches and socket surrounds so you don’t cut on site.
- Purpose: reduce heat transfer through cold external walls; lift internal surface temperatures; tame condensation; steady summer gains on west-facing rooms.
Why DIY matters for households and for value
- Cost control: you buy the product and install it at your pace—no third-party labour, no scaffolding, no diary drama.
- Minimal disruption: no wet trades; furniture slides forward and goes back the same day.
- Property value: properly insulated interiors feel warmer at lower thermostat settings and present better on viewings; improving fabric efficiency supports stronger EPC outcomes.
- Heritage and rentals: when you cannot touch façades or swap windows, an internal, reversible lining is often the only compliant path to comfort.

Where VIW delivers the most
- External walls in bedrooms and living rooms (the classic “cold-back” wall).
- North and west elevations that stay chilly or get late-day solar spikes.
- Behind wardrobes, sofas and bookcases where stagnant air invites condensation.
- Window reveals and chimney-breast returns that act as thermal bridges.
- Home offices where stable comfort reduces heater use and fan noise.
A clear, homeowner-friendly installation plan
You will need: VIW tiles, acrylic primer, fine filler, sanding block, spirit level/laser, pencil, soft roller, lint-free cloths, masking tape, a small rubber roller, and a sharp craft knife only for release-liner edges (not for cutting tiles).
1) Choose the right wall
Start with a cold external wall in a regularly used room. Avoid surfaces with visible damp—fix moisture first (leaks, rising damp, or unvented drying).
2) Check the surface
Painted plaster, plasterboard or skimmed masonry work well. The wall should be sound, clean, flat and dry. Remove flaking paint, fill cracks, sand smooth, vacuum dust.
3) Prime
Apply an acrylic primer to bind dust and even out suction. Let it dry as directed. This improves adhesion and reduces future edge-lift.
4) Plan the layout
Snap a dead-level datum line near the skirting and mark a light pencil grid at 200 mm. Dry-lay a few tiles to understand joints and pattern. Pre-place any pre-cut pieces for corners and reveals.
5) Start square and true
Peel a short strip of liner on the first tile to create a hinge. Align to the grid; stick the top edge lightly; check level; peel the rest while smoothing down.
6) Press and roll
Use a rubber roller to press from centre to edges. This collapses any micro-ridges and maximises contact.
7) Work outwards
Run the first course, then stack courses above. Keep joints tight, clean and consistent. Leave a 2–3 mm perimeter gap at skirtings, corners and frames for a neat seal.
8) Finish the edges
Mask either side of joints; apply a colour-matched sealant or our decorative joint strips; tool smooth; pull the tape for a crisp line.
Important: do not cut or drill through a tile. If you need to mount a shelf or picture, use a rail fixed above the tiled zone, or span fixings in the adjacent, untiled area.
Practical room-by-room tips
- Bedrooms: treat the wall behind the bed first; you’ll feel less radiant chill at night.
- Living rooms: treat the TV wall or sofa wall; pair with thick curtains (or our Vacuum-Insulated Curtain) to calm the glazing line.
- Kitchens: avoid direct splash zones; wipeable faces are fine elsewhere; ensure good extraction to keep humidity down.
- Home offices: treat the desk-side wall to reduce draught sensation and maintain comfort for long sessions.
Condensation and indoor air quality—handled sensibly
By lifting internal surface temperatures, VIW reduces the conditions that allow condensation to form. Keep rooms ventilated (trickle vents or a brief window open), especially after showers, cooking or drying clothes. If you already have persistent damp unrelated to surface cooling, diagnose and fix the source before lining.
Renter and leasehold considerations
VIW is semi-permanent. Removal can mark paint or skim. If you are renting, seek written permission and agree a make-good approach. For a non-invasive alternative at windows, consider our Vacuum-Insulated Curtain alongside VIW on the coldest wall for a combined effect.
Common questions—answered plainly
Can I cut a tile to fit a socket?
No. We supply pre-cut pieces for sockets and switches. Keep live circuits isolated while working; a competent person should refit plates.
Is it paintable?
The decorative face arrives finished. If you plan to paint, request a paint-ready face at order stage.
How do I clean it?
Use a soft cloth with mild detergent. Avoid abrasives and solvent-heavy cleaners.
Is it safe near heat sources?
Keep standard clearances from radiators or stoves. As with any wallcovering, avoid direct flame and very high surface temperatures.
What about sound?
The evacuated core reduces airborne noise through the treated wall. You will notice a calmer room, particularly against street-side façades.
Ordering, measuring and receiving
- Measure the wall area and add 10–15% for corners, pattern match and future repairs.
- Send us simple sketches or photos; we’ll mark socket pieces and reveals on a layout plan so you can install confidently.
- Tiles arrive boxed by zone, with a short guide, joint strips (if requested) and care notes.
Why this is different from “thick boards on battens”
- Depth: at 4 mm total, furniture and skirtings rarely need modification.
- Cleanliness: no sawdust, no batten drilling, no plaster skim.
- Speed: rooms remain usable the same day; you work in small sections at your own pace.
- Continuity: small tiles make it easy to run behind obstacles and maintain coverage where big boards would stop.
Ready to insulate the room that costs you the most?
- Contact our Customer Service Team for a DIY pack list, substrate checklist, and a tailored price quotation.
- Prefer a direct conversation? You are most welcome to email or phone Professor Saim Memon so we can discuss your rooms, photos and goals—and propose the right combination of VIW and complementary window treatments.
- Explore the full range, specifications, how-to videos and FAQs at www.sanyoulondon.com.
Take control of your bills and comfort. With VIW (Sanyou London) you can insulate responsibly, beautifully and affordably—by yourself.
Share


Author
Prof. Dr. Saim Memon
PhD, CEng, FHEA, MSc, BEng(Hons), PGC-TQFE, GTCS, MCMI, MIET, MIEEE, MInstP, IBPSA, APCBEES, MPEC
CEO | Industrial Professor | Inventor | British Scientist | Chartered Engineer | Qualified Teacher | Chief Editor | World Speaker | Pioneer in Vacuum Insulation Energy Technologies